Biopsy
Contents
- The biopsy sample on the way to the laboratory
- The biopsy sample in the laboratory: cutting the specimen and preparing sections for slicing thinly
- The biopsy sample in the laboratory: mounting the slices on glass plates and staining them
- The biopsy sample under the microscope
- Frozen section
- Cytology
- Common uses of biopsies in oral & maxillofacial surgery
- The communication channels: pathologist => surgeon => patient
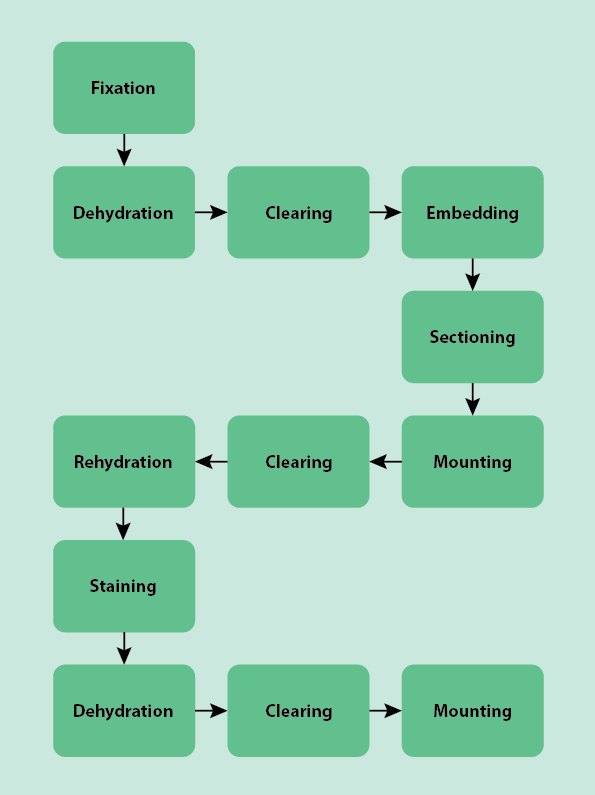
Once a biopsy is taken in an outpatient setting or in operating theatre, the specimen must be examined by a trained histopathologist (in this context, histology is the process of examining a human tissue specimen; veterinary surgeons and anthropologists also use histopathology techniques). Before it can be examined under a microscope, the specimen must be prepared. This preparation usually follows a typical, standardised general process through the laboratory with many of the steps done as an automated batch process by machines, improving efficiency. Figure 1 outlines the numerous, almost algorithmic steps necessary to get a typical biopsy specimen ready for examination. Below we describe this process step by step. This journey through the laboratory is for typical cases of mostly soft tissue samples. Some samples, such as frozen sections and cytology specimens (examination of individual cells in biopsy specimen) such as samples obtained by fine needle aspiration biopsies, are processed slightly differently and are discussed separately.
The biopsy sample on the way to the laboratory
The course of action before sending the biopsy specimen on its way to the laboratory depends on the kind of biopsy taken. That is whether a diagnostic incision or core biopsy, a cellular sample (by aspiration with a needle), or a therapeutic excision biopsy were taken.
A core biopsy and a liquid / cellular sample collected with a needle cannot be orientated. The specimen is placed directly into the transport or fixation medium (see below) and transported to the laboratory.
For an incision biopsy, knowing the orientation of the specimen and sharing this information with the pathologist is important. Defining orientation of the specimen is usually achieved by placing at least two marker stitches on the sample, and relating this to a drawing of the specimen, and where it came from.
For an excision biopsy, knowing the orientation of the specimen and sharing this information with the pathologist is essential. In some cases this can be achieved in similar ways as for incision biopsies. Some complex specimens can be oriented by suturing to a diagram board (this is used in neck dissection and is especially important if no real anatomical landmarks are available in the specimen). Some surgeons cut the specimen in theatre themselves and use marker stitches and diagrams at each level to orientate the specimen. This, plus the written information sent along, is the only routine means a surgeon has to communicate with the pathologist. As this information is essential, this process should not be delegated to anyone not capable of understanding and acting on the information.
The biopsy sample in the laboratory: cutting the specimen and preparing sections for slicing thinly
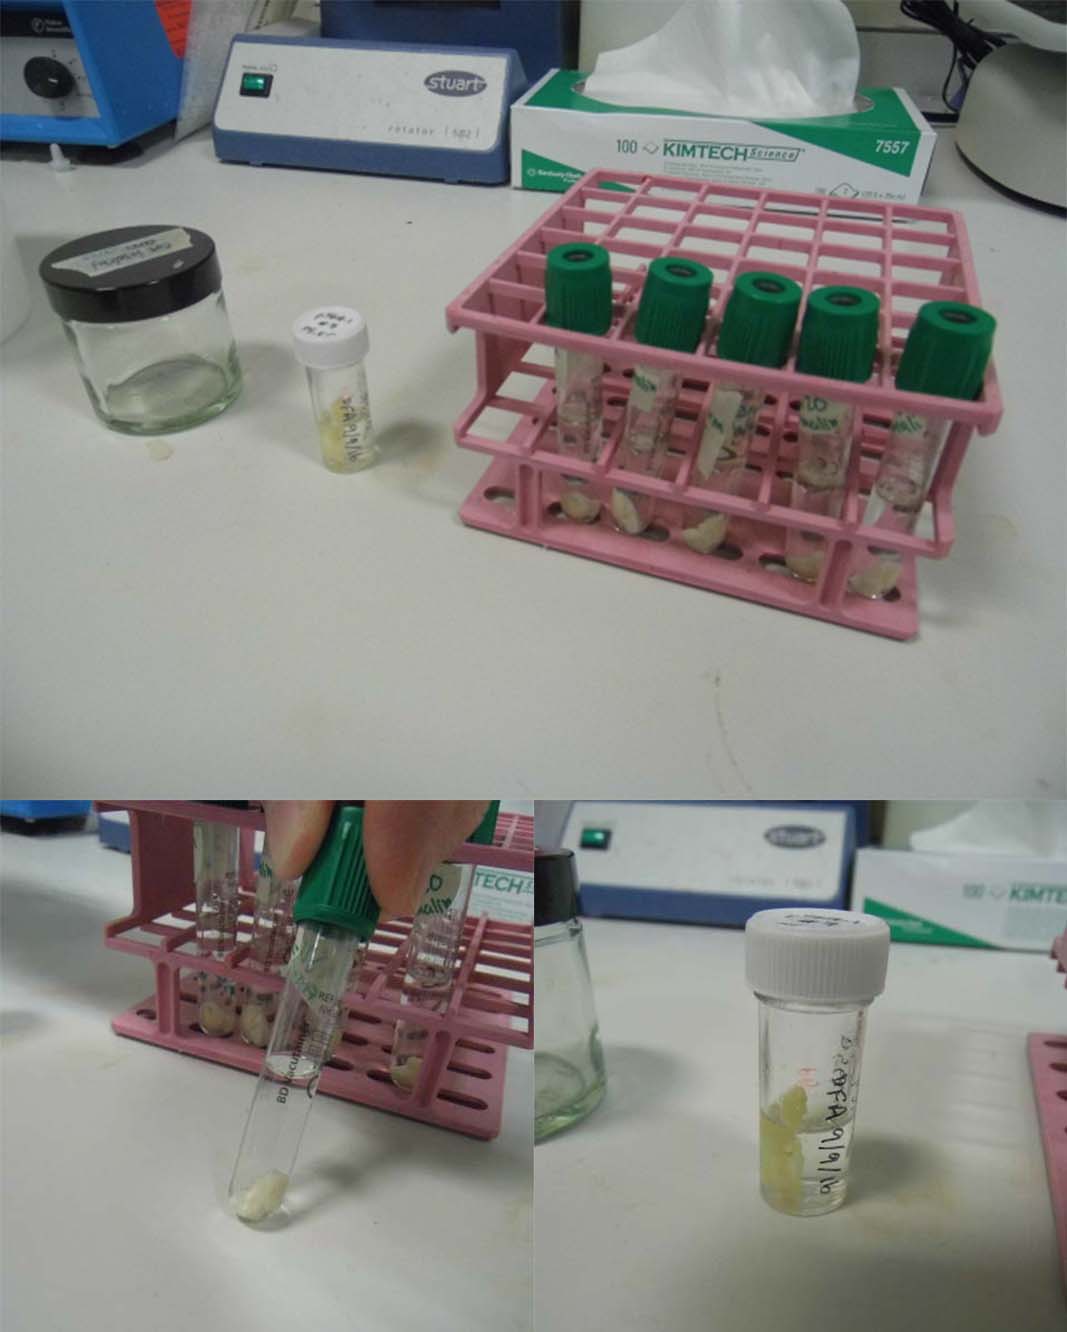
When the specimen arrives at the laboratory (Figure 2), it may or may not be in a fixative already. If it is not in a fixative, it will be in a buffer solution (a solution that stops the specimen from becoming more acidic or more alkaline, preserving the state the specimen was in when it was taken) and needs to be moved into a fixative. Fixatives are chemical solutions that preserve the structure and cells of the specimen by hardening the tissue and inactivating the enzymes, so preventing the tissue from degrading. The most common fixative is formaldehyde, often in a buffered solution referred to as formalin, although others such as ethanol are also used.
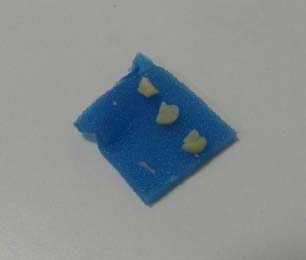
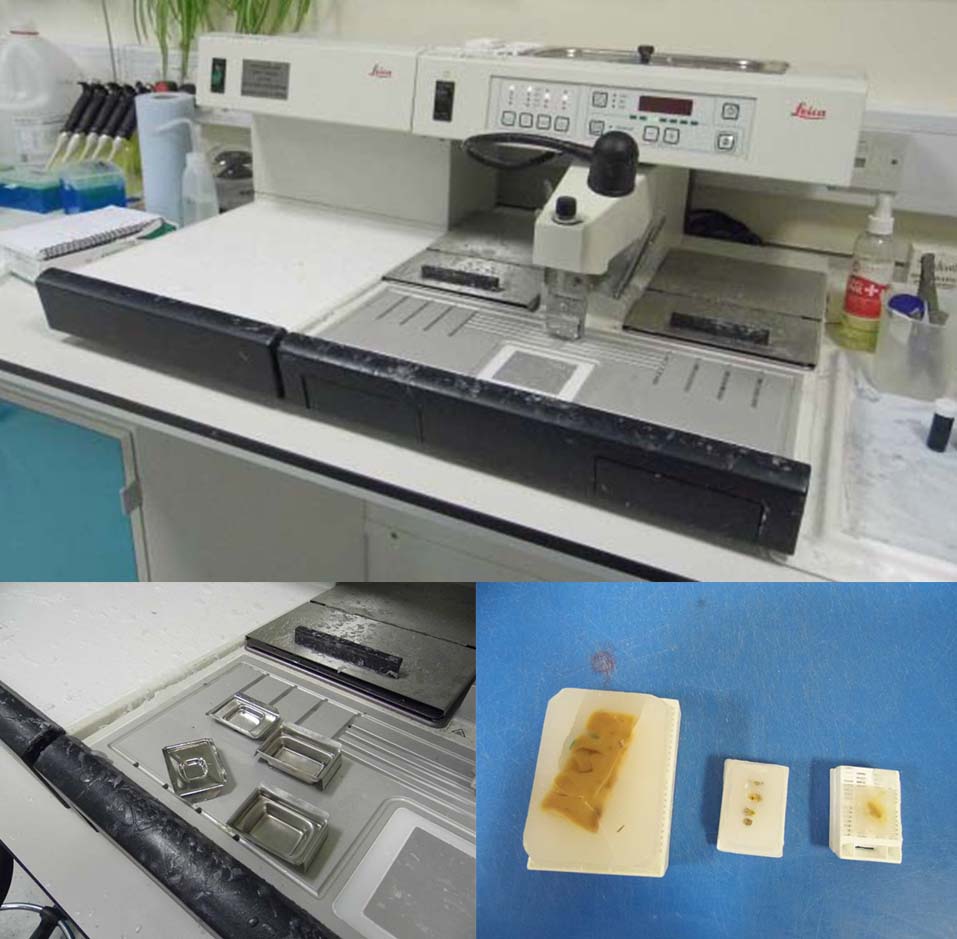
A macroscopic evaluation of the specimen is carried out to note the appearance before processing occurs. The specimen is trimmed at this stage and needs to provide sections that are representative of the whole specimen (Figure 3). This is sometimes done by the surgeon in theatre (see above). These sections will need to be cut again before they can be examined with a microscope. To prevent tissue damage caused by cutting, the specimen must be hardened further before cutting it.
After the specimen has been in the fixative, it must be prepared for embedding in wax so it can be cut. The specimen contains water, as the human body is made up of approximately 50 to 60 % water, however wax is not soluble in water. The water must therefore be removed from the specimen and replaced with a solvent that wax is soluble in. The specimen is transferred through a series of baths with water-alcohol mixtures with increasing concentrations of alcohol (Table 1; Figure 4). This dilutes and eventually (at absolute alcohol level) replaces the water in the specimen. The absolute alcohol is replaced several times to ensure it is not contaminated and that all water is replaced. Delicate specimens are transferred through more concentrations of alcohol (Table 1) to minimise tissue distortion.
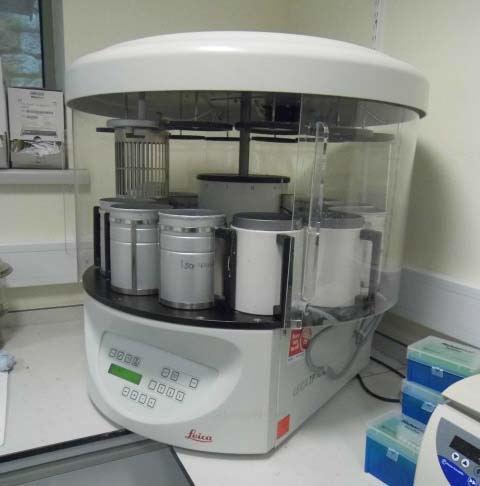
Table 1 Examples of typical increasing concentrations used to dehydrate biopsy samples
| Type of specimen | Typical concentrations of series of consecutive alcohol baths |
|---|---|
| delicate | 15 %, 25 %, 50 %, 70 %, 95 %, 100 % |
| solid | 70 %, 95 %, 100 % |
Using series of baths with increasing alcohol concentrations minimises tissue distortion by gently reducing the tissue water content in a stepwise manner. This prevents artefacts in the final sample preparation. Specimens may be agitated (shaken) whilst they are being dehydrated to speed up the process.
The tissue must be ‘cleared’ before it can be embedded in wax. This is done by placing the specimen in an organic solvent such as xylene or toluene, known as a clearing agent (as the specimen often looks completely clear when immersed in the clearing agent), which replaces the alcohol in the specimen. The specimen is then placed in warm wax, most often paraffin wax, in a mould (Figure 5). The wax is soluble in the clearing agents allowing it to permeate the specimen. When it cools, the wax hardens, allowing the specimen to be cut into thin slices. If electron microscopy is going to be needed, synthetic resin must be the embedding medium. Resin is much harder than wax, allowing very thin sections to be cut which are needed for electron microscopy.
Whilst soft specimens must be hardened before cutting, hard specimens, such as bone or tooth samples, are too hard to cut. They must be softened after they are fixed but before they are dehydrated, cleared and embedded. This is done by removing some / most of the inorganic salts in these hard tissues (demineralisation). Exactly which inorganic components need to be removed depends of the type of specimen and its composition. Any fixative needs to be removed before demineralisation to avoid chemical reactions between the various chemicals. Bone and tooth specimens are calcified (contain calcium ions). These calcium salts make them hard. They are softened in a process called decalcification, by dissolution of the calcium salts. This process mostly relies on treating the specimen with suitable acids or with chelating agents (chemical compounds with a particular ability to bond with calcium ions).
Once the specimen is suitably softened, it needs to be dehydrated, cleared and embedded. Embedding media for hard tissue samples, such as bone and teeth, are different from those used for soft tissues. Nitrocellulose and low-viscosity nitrocellulose are often used to embed hard tissues. These cellulose derivatives provide better support for cutting hard specimens. Also, there is less shrinkage and distortion than with paraffin wax, although in principle wax can be used to embed decalcified specimens. Nitrocellulose can make the cutting process more difficult because these samples normally need to be cut wet, and the cutting is slower than for wax embedded samples. Sometimes a double embedding of nitrocellulose and paraffin wax is used to make cutting the sample easier.
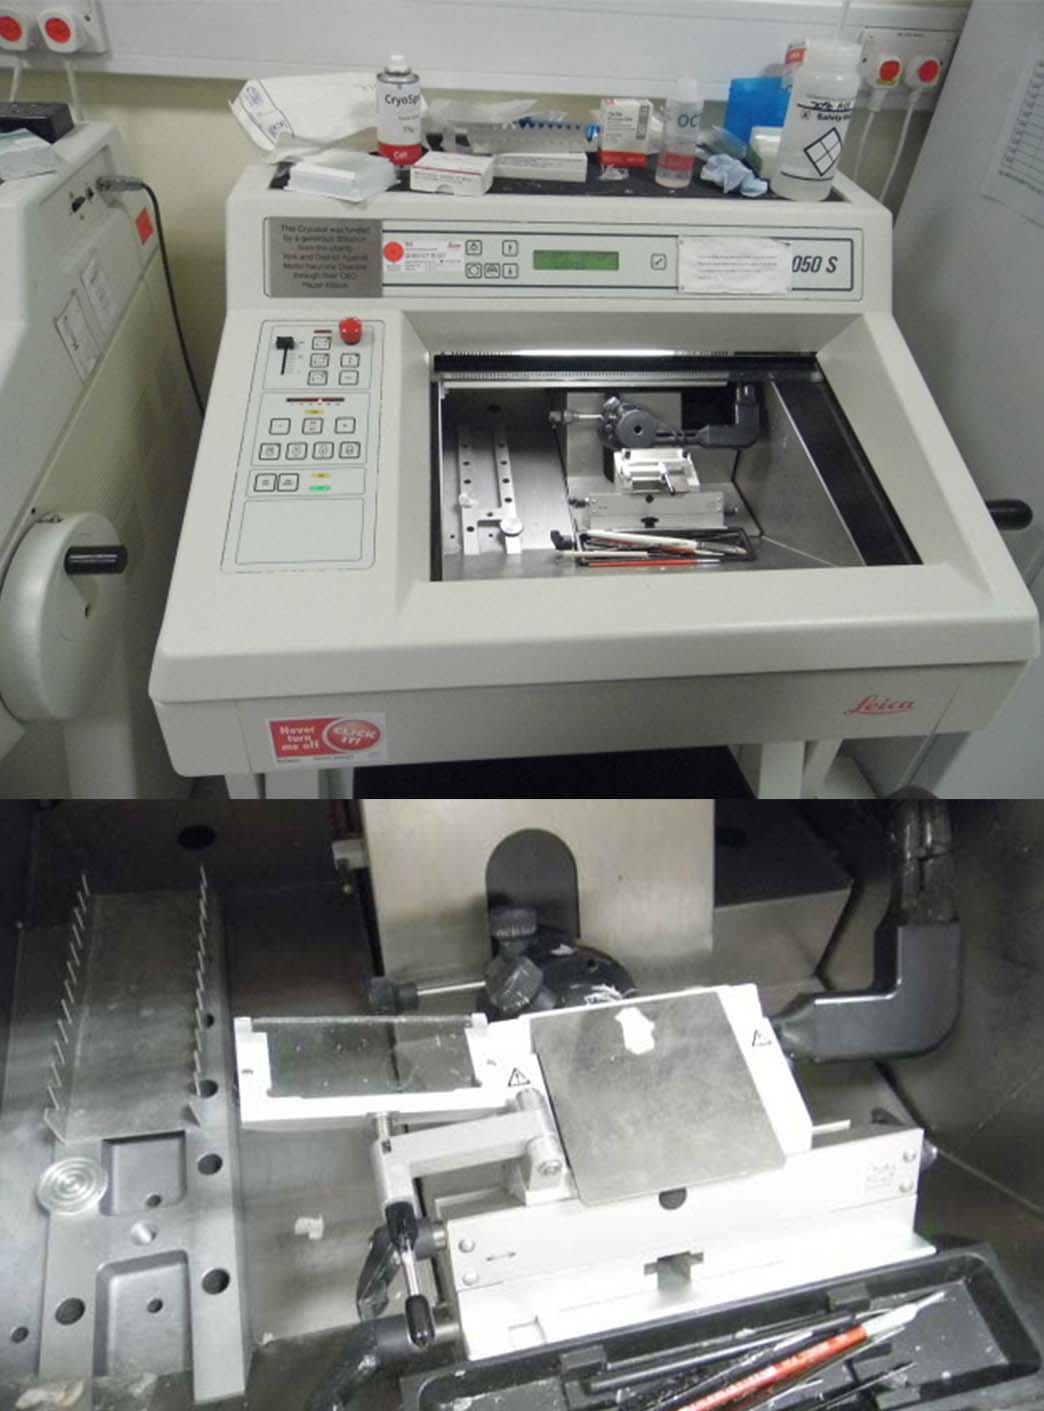
Cutting is done by a knife called a microtome (a precision mechanical instrument that is used to cut specimens into very thin uniform sections / slices; Figure 6). For examination of the sample by light microscopy, the thickness of the sections can vary between 1 and 10 µm, whereas for electron microscopy, the thickness of the sections must be around 0.01 µm, an ultra-thin section.
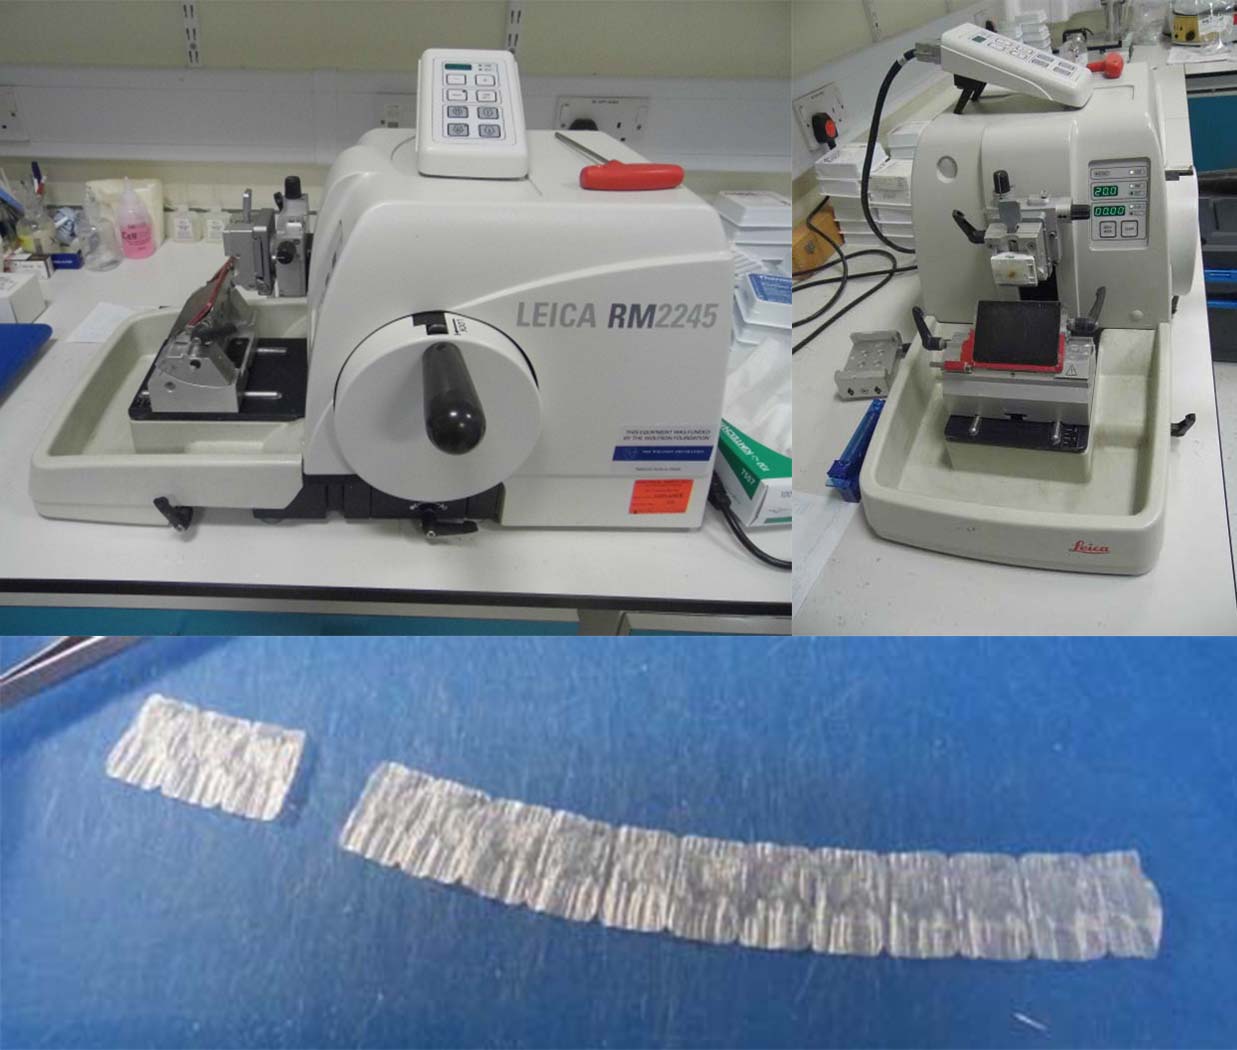
There are many different types of microtomes, with the two basic types of microtome employing rotary (Figure 6) and sliding (Figure 7) cutting mechanisms, respectively. These standard microtomes are used to cut semi-thin to thin sections from paraffin wax-embedded and resin-embedded specimens for light microscopy. The sliding microtome was originally designed for cutting celloidin-embedded sections of mostly hard tissue samples.
In a rotary microtome, the knife is fixed in place and the specimen is moved towards and away from the fixed knife. In a sliding microtome, the knife moves and the specimen is fixed. Rotary and sliding microtomes are often not suitable for cutting harder tissues, particularly bone if it is undecalcified. Undecalcified bone is cut with a saw microtome, which has a diamond coated fast-rotating blade. Bone cannot be cut into thin sections using this method. The ultra-thin sections required for electron microscopy are cut using an ultra-microtome, which has a knife made from glass or diamond.
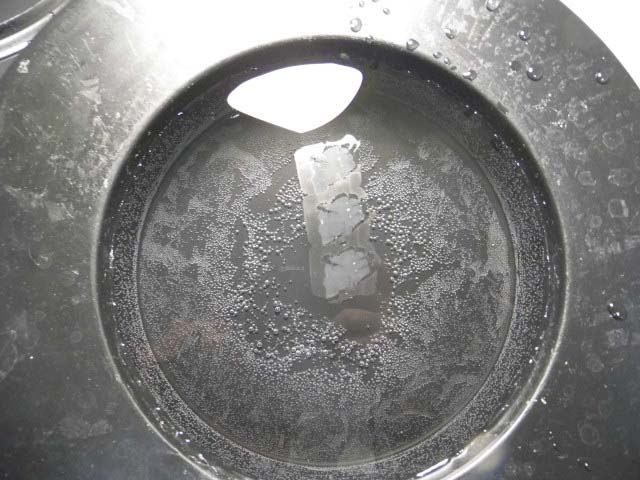
Once the sections have been cut, they are either floated in a water bath (Figure 8) until they are needed or are put directly onto a glass slide. The ‘parked’ floating sections later also need to be put onto a glass slide before further processing.
The biopsy sample in the laboratory: mounting the slices on glass plates and staining them
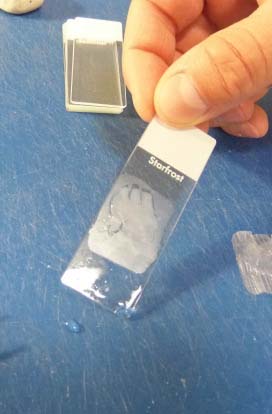
The cut wax sections are laid onto glass microscope slides (Figure 9). This literally involves fishing out, with a glass slide, from the water bath the floating thin sections.
In this pristine condition, the cellular structures are not easily visible in detail under a microscope, so the specimen needs to be stained. The stains that are used are all aqueous solutions, meaning that now the wax needs to be dissolved and the specimen rehydrated (the wax replaced with water) for the stain to be able to penetrate the specimen. A clearing agent is used to replace the wax and then the specimen is submerged in a series of baths with decreasing concentrations of alcohol ending at 0 % alcohol concentration, pure water. This is the reverse of the previous dehydration steps.
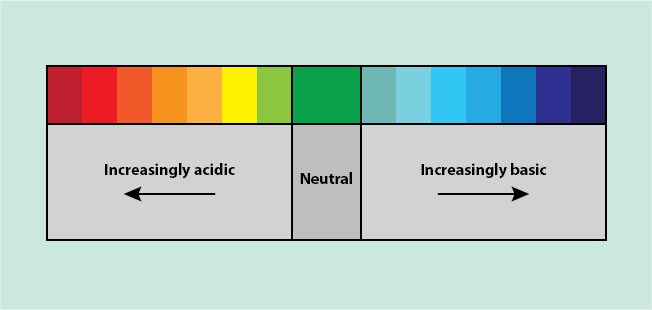
Once rehydrated, the most common method of staining is called haematoxylin and eosin (H & E) but there are hundreds of more specific stains and dyes. Haematoxylin and eosin use acid - base chemical reactions to stain specimens. Acidic compounds form an ion that has a positive charge (H+), leaving the molecule with an overall negative charge. Basic compounds form an ion that has a negative charge (OH-), leaving the molecule with an overall positive charge. Positively and negatively charged molecules tend to react with each other in a neutralisation reaction. Acidic and basic compounds can be classified using acid - base indicators such as the universal indicator. The universal indicator changes colour when probing a compound, based on how acidic or basic it is (Figure 10).
Haematoxylin and eosin molecules have a chromophore bound to the acidic or basic region in the molecules, respectively. A chromophore is a functional group in a molecule that is responsible for the colour of the compound, and this is how the stains produce colouring of biopsy specimen, after binding to specific types of cell components.
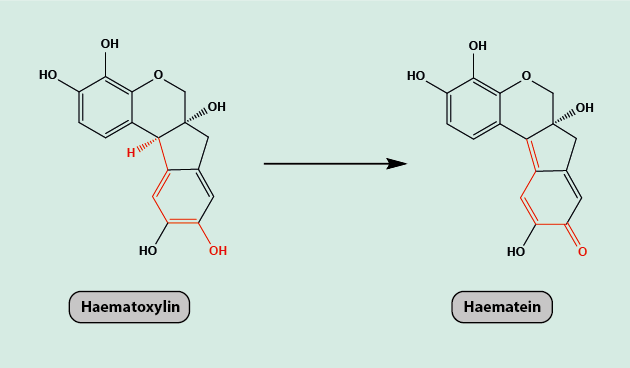
Haematoxylin can only be used as a dye in its oxidised form, haematein (Figure 11). It is a basic dye, which binds to acidic structures within the specimen, such as the nucleus of the cell, DNA or RNA (genetic material) or cartilage, staining them a purple or blue colour.
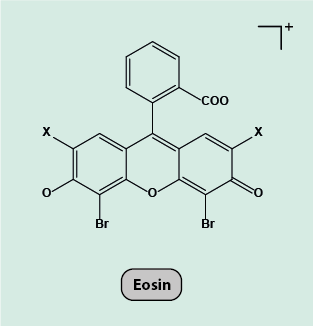
Eosin is a negatively charged acidic dye, which binds to basic components within the specimen, such as proteins, staining them a red or pink colour. There are two different types of eosin, eosin Y and eosin B. Eosin Y is the most commonly used type (Figure 12).
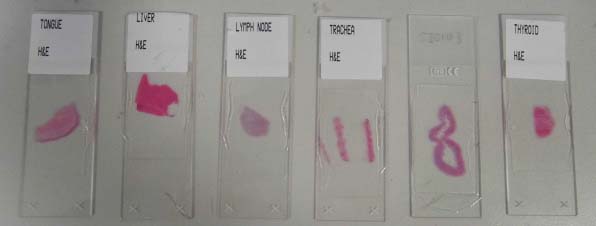
Specimens are stained first with the oxidised form of haematoxylin, haematein, then washed, stained with eosin and then washed again. The two types of stains are complementary and when used together, highlight all the most important cell structures in easily distinguishable bright colours (Figure 13).
More specific stains can be used to visualise specific cell-surface proteins or disease-specific characteristics. Examples of more specific staining procedures are antibody or fluorescent staining (see below). Over the past decade such specific stains have become more widely used.
Fluorescent staining is most commonly used in fluorescence in situ hybridisation (FISH), which uses fluorescent probes (fluorophores) that bind to complementary sequences of DNA or RNA. Fluorescence is the visible (or invisible, to the eye) light given off by some chemical compounds when irradiated with UV light. Such chemical compounds are typically organic molecules with a flat molecular structure and a resulting delocalised electronic structure within the molecules.
Staining a sample with a fluorescent probe allows locating and quantifying those structures in the specimen that the fluorescent probe bonded to, typically some target sequences in DNA or RNA looking for highly specific information. This is done by using fluorescently labelled strands (probes) of DNA or RNA, which are complimentary (and so will bind to) to a target sequence in the DNA or RNA of the specimen (Figure 14).
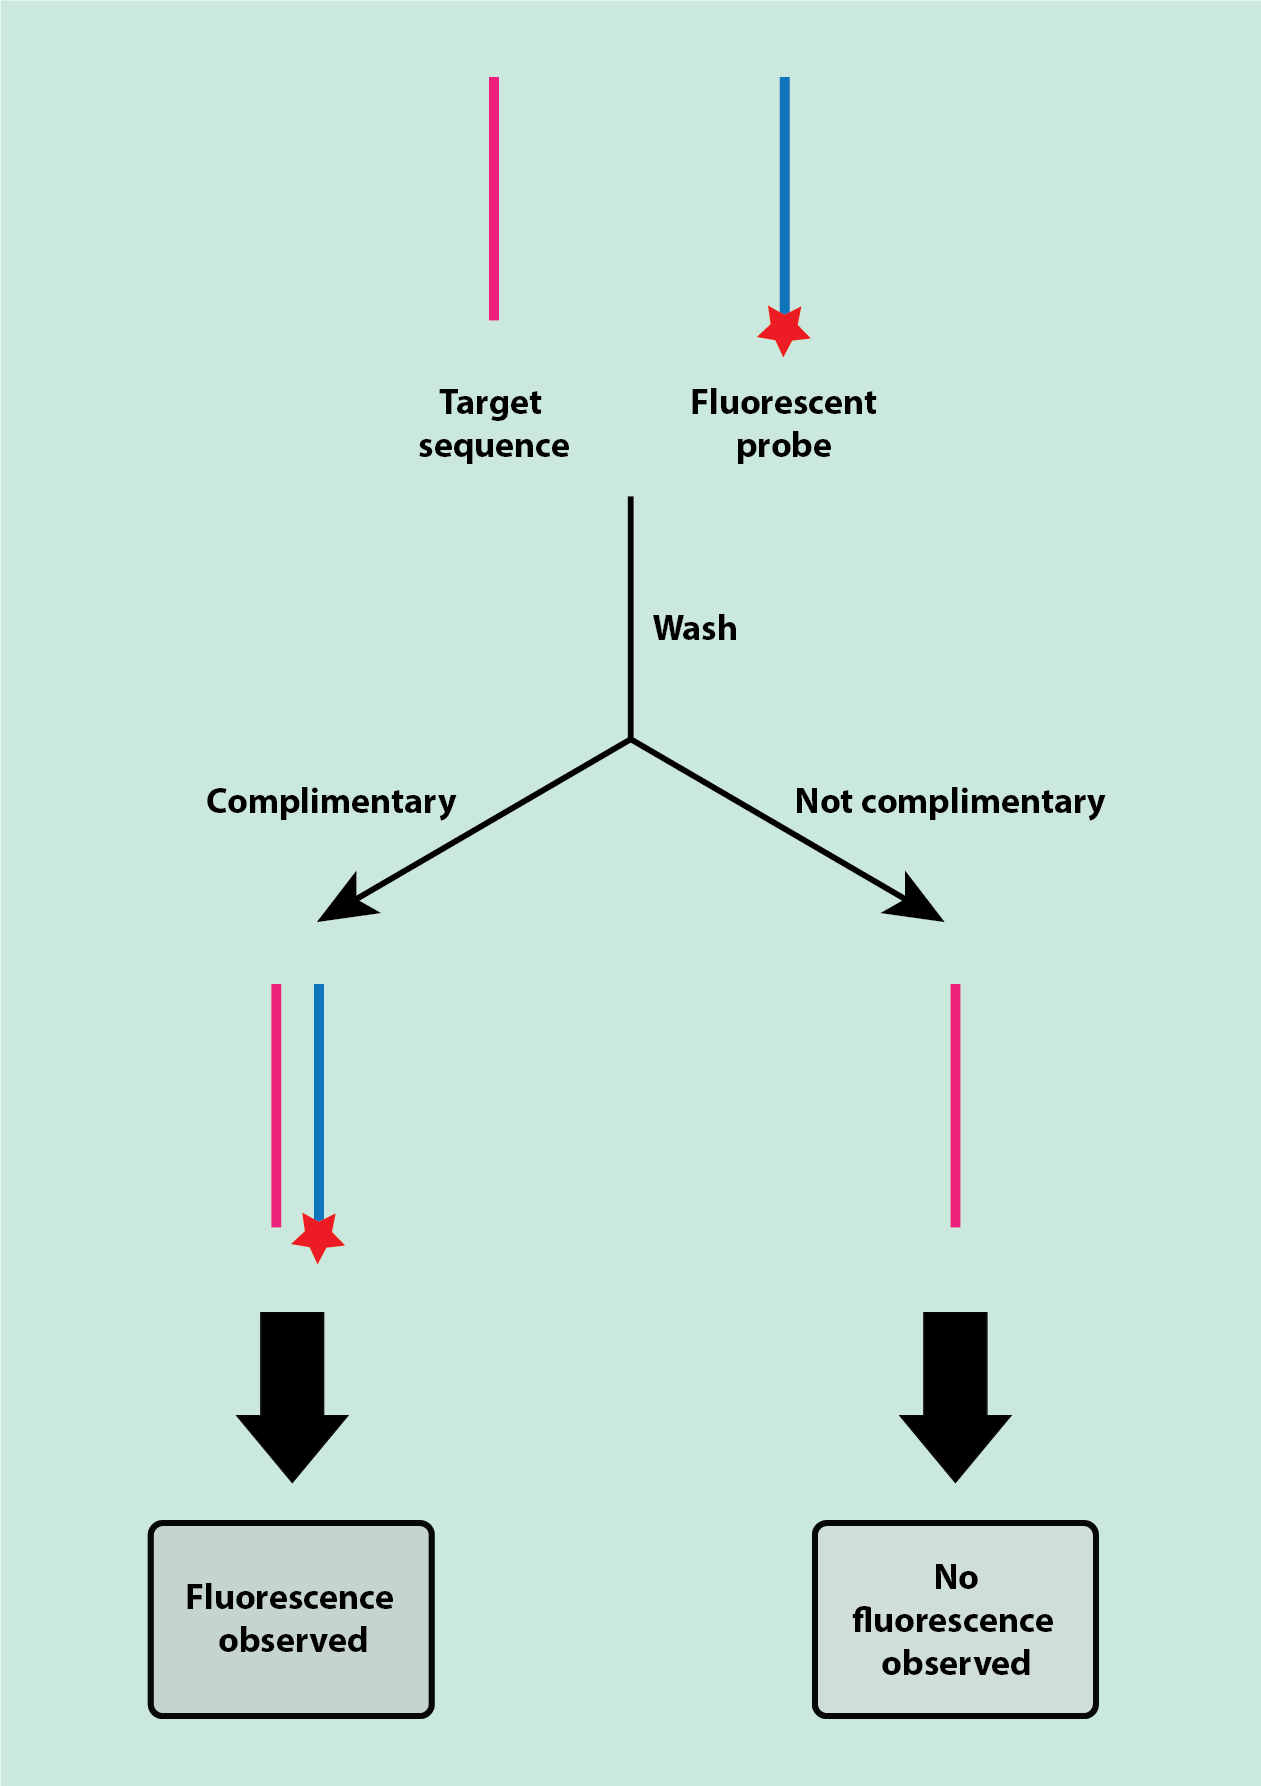
The fluorescent probes are applied to the specimen and then the specimen is washed to remove any of the unbound probe. Only probes that have bonded to the complimentary target sequence will be left on the specimen, so any fluorescence shows the location and number of there complementary target sequences. An example of an application for this staining technique is the identification of a range of bacterial infections, identifying specific DNA/RNA sequences of the infecting agent(s).
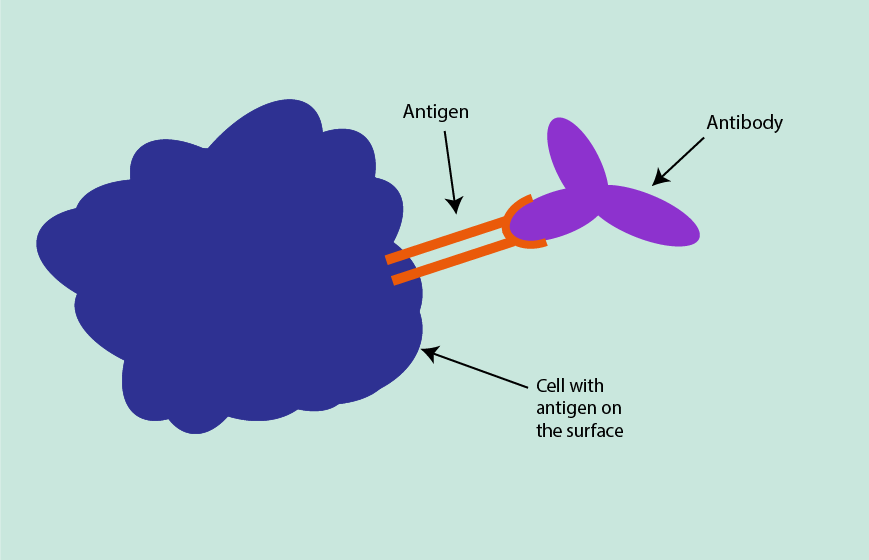
Immunohistochemistry uses antibodies that are specific to certain cell-surface proteins. Immunohistochemistry is based on the affinity between antigens and antibodies. Antigens can be present on cell surfaces, in cells or on proteins, and have a specific shape. A diagnostic antibody, which is complimentary to the shape of a target antigen (like a key is complimentary to the shape of a lock), can be introduced and, if the target antigen is present, will form an antigen-antibody complex (Figure 15).
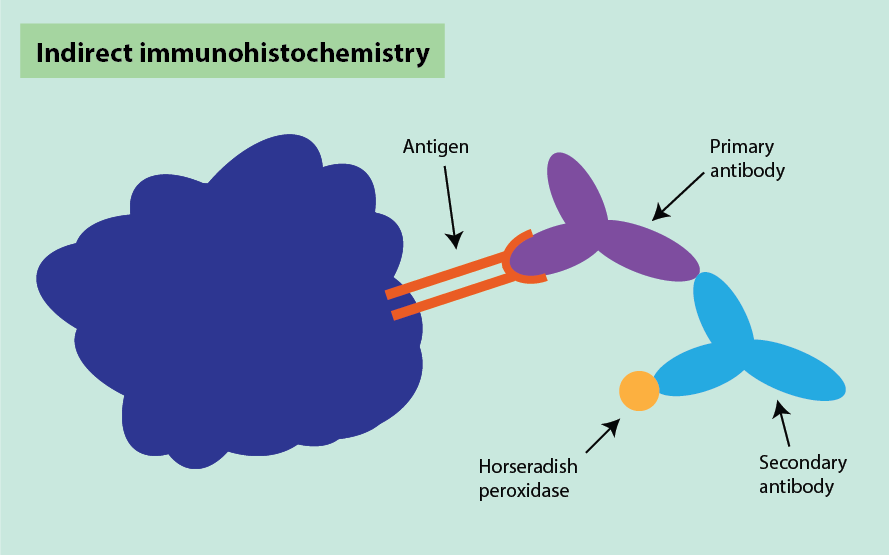
Often, an indirect technique is used for visualisation. This involves using two antibodies. The first (primary) antibody recognises the specific antigen of interest in the specimen, and the second (secondary) antibody recognises the primary antibody. The secondary antibody is most often labelled with horseradish peroxidase which turns brown upon binding to the primary antibody (Figure 16). A counterstain is sometimes used to provide contrast, helping the primary stain to stand out. The complex formation can be visualised by a colour reaction on the slide.
Fixing, dehydration and wax embedding can destroy or mask antigens, which means antibody staining may not always work. There are ways to ‘unmask’ the antigens from some specimens, such as using microwave ovens or pressure cookers.
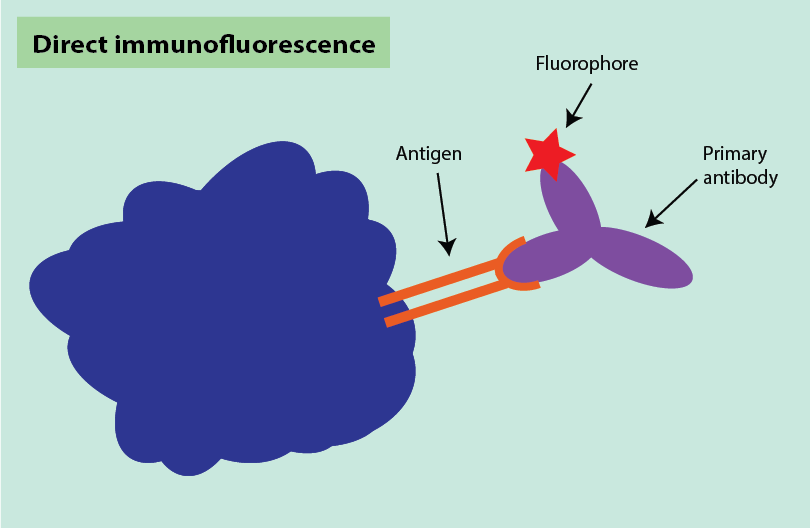
Immunohistochemistry can be combined with fluorescent staining, in a process called immunofluorescence, with two main methods used. Direct immunofluorescence uses one fluorescently labelled antibody to bind to its target sequence (Figure 17).
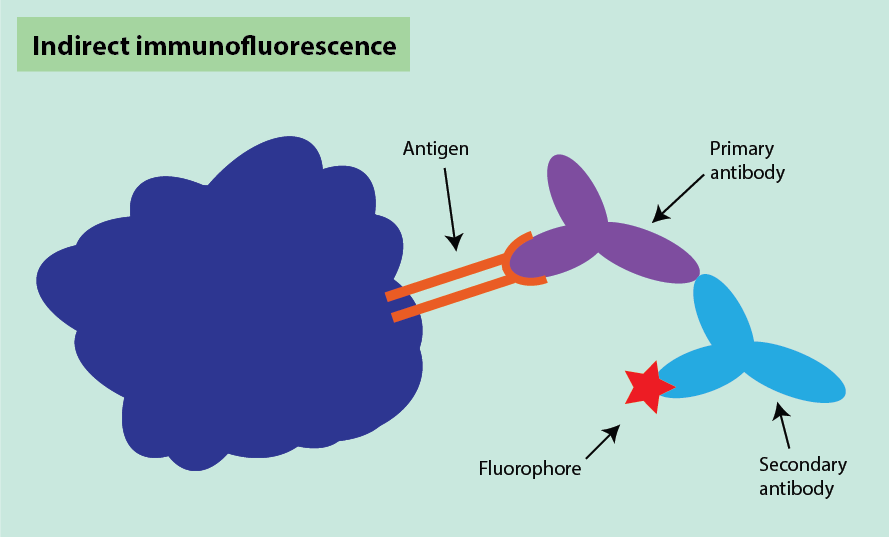
Indirect immunofluorescence is similar to the indirect technique for immunohistochemistry (see above). It uses two antibodies where the first antibody binds to the antigen target and the second antibody binds to the first antibody. In this method, the secondary antibody is fluorescently labelled instead of being labelled with horseradish peroxidase (Figure 18).
Generally, once all the preparation steps have been carried out and staining is complete, the specimen must be dehydrated again. This follows the same approach as in the first dehydration step when preparing the specimen to be embedded in wax for cutting. Now the specimen is embedded in a mounting medium (a solution that stabilises the specimen and which does not affect the staining of the specimen and also helps to keep the coverslip in place). The mounting medium must be soluble in the organic solvent used to clear the specimen. The choice of mounting medium will vary depending on whether it is a hard or soft tissue sample. The choice includes resins (synthetic, semi-synthetic or natural), glycerol gel or fructose syrup. The specimen in the mounting medium on the microscope slide is finally covered by a thin glass coverslip to protect and preserve it.
The biopsy sample under the microscope
Once the specimen has been stained, dehydrated, cleared and mounted, it is ready to be inspected with a microscope. The type of microscope depends upon the type of staining used on the sample and the detail and type of information needed.
The general choice of microscope is the light microscope where visible light is focused on the sample, which is observed through an eyepiece. Different magnifications can be achieved depending on the magnifications of the eyepiece lens and the objective lens, with the magnifications being multiplied together to give the overall magnification. This can be used to visualise most specimens, including those with haematoxylin and eosin staining and antibody staining with horseradish peroxidase (Figure 19). A light microscope is not suitable to examine fluorescent staining or very small structures within the specimen. The best resolution a light microscope can achieve is approximately 0.2 µm. As cells tend to be about 20 to 40 µm in diameter, these can be seen easily using a light microscope. Structures within cells, which are smaller than 0.2 µm, cannot be seen however.

To be able to investigate structures smaller than 0.2 µm, an electron microscope is used. This uses a beam of electrons, instead of a (visible to the eye) light source. The electron beam has a much shorter wavelength than visible light, allowing for increased resolution. The resolution of a standard electron microscope is about 1 to 2 nm (equivalent to 0.001 to 0.002 µm). Much finer structural detail can be seen by electron microscopy than by light microscopy.
When fluorescent staining is used, a fluorescence or confocal microscope is needed for examination of the stained structures. Fluorophores absorb light at a specific wavelength and re-emit light at a different (usually longer) wavelength. This is a similar principle to how objects are seen as a specific colour in the visible range of light. Objects appear as the colour of the wavelength of light they do not absorb (Figure 20).
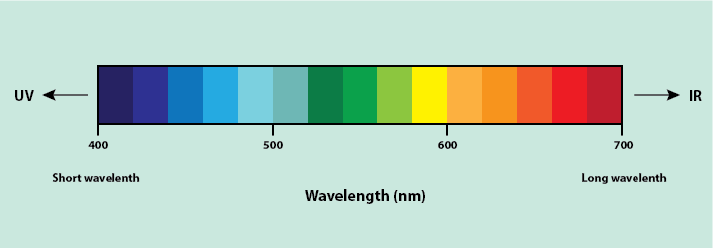
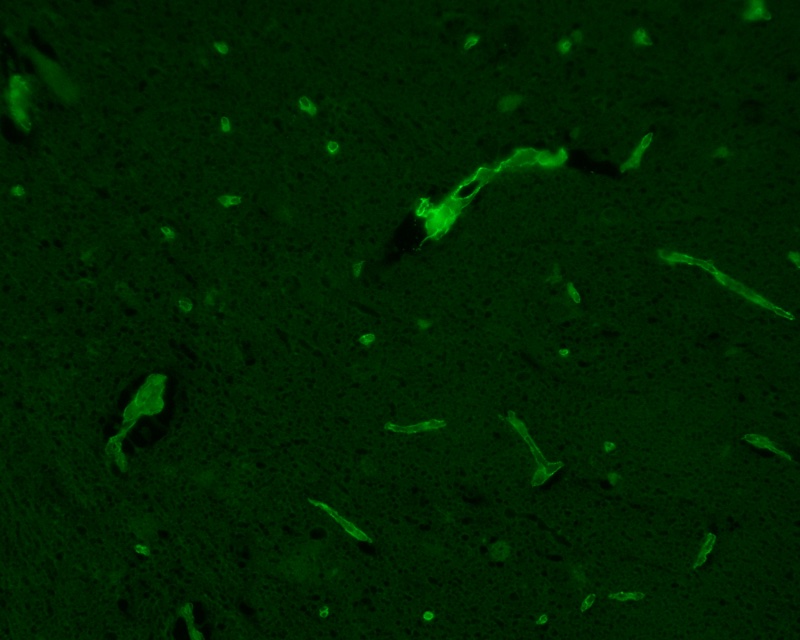
For example, a red apple absorbs light at all wavelengths except for the wavelength for red light, which it reflects, so appearing red in colour. The difference between this and fluorescence is that light absorbed is not in the visible region of the spectrum (UV light is often used) and, instead of reflecting light, it re-emits the light at a longer wavelength (in the visible light region). A fluorescence microscope uses this principle, using UV light to excite fluorophores within the specimen and causing the re-emission of light at a longer wavelength by the stained specimen. The microscope then uses an emission filter, which filters out all light except light at the wavelength emitted by the fluorophores, meaning only the emitted light from the specimen can be visualised. Due to this filtering, fluorescing materials appear bright (the colour depends on the fluorescent material used) against a dark background (Figure 21). A confocal microscope works in the same way as a fluorescence microscope but uses a laser instead of ordinary UV light.
A histopathologist examines the slides under the relevant microscope. Experience is a crucial ingredient in the process to identify structures within the specimen, to form conclusions about the specimen, and to suggest a diagnosis (or exclude one). Much of this process may be considered as pattern recognition by a very highly trained human eye. The results of the examination are summarised in a written report for the surgeon. In urgent cases, this is by same day internal delivery but a definitive report may take over a week. This is (in the UK) largely dependent on availability of trained pathology technicians.
Identification of rare entities requires specialisation by the histopathologist (in much the same way as surgery has become anatomical site specific, and even disease specific). The role of centralisation and international expert groups is relevant here and can greatly increase the time taken for a definitive result to come back and enable the surgeon to inform their patient.
Frozen section
When analysis of a specimen is needed rapidly, frozen sections are often taken. Examination of frozen sections must be pre-arranged with the histopathology laboratory. Once taken, the biopsy sample is transferred immediately to the laboratory for preparation and interpretation. Like with most general specimens, knowing the orientation of the frozen section is important and so this information must be conveyed with the sample. Frozen sections are used for solid tumour surgery where the aim is to resect as little healthy tissue as possible whilst ensuring a clear surgical margin (microscopically usually defined as 5 mm although this varies by site and disease). The frozen section specimen is used to determine if the surgical margin is clear or whether more tissue needs to be excised.
When the sample arrives in the lab, it may or may not be in a fixative. The sample is frozen and cut using either a freezing microtome or a cryostat (a microtome mounted in a freezing cabinet). Freezing the sample hardens it such that it can be sliced.
The freezing microtome is connected to a cylinder of carbon dioxide which is used to rapidly freeze the specimen. The knife of the freezing microtome is moved whilst the specimen remains static to cut sections from the frozen block. However, this method cannot produce very thin sections. For thin frozen sections, a cryostat is used. In the cryostat, a microtome of any type is enclosed within a deep-freeze cabinet. The specimen is snap frozen at a very low temperature (either using liquid nitrogen or isopentane cooled to -80 °C) with the temperature of the cryostat regulated between -10 °C and -30 °C and thin sections cut from the frozen specimen.
The frozen thin sections can then be applied to slides, stained, and mounted more rapidly than in the general method. Generally, staining and mounting techniques for frozen sections are very similar to those for normal sections.
Whilst frozen sections provide rapid results, they are notoriously inaccurate. In the process of freezing the sample, the water expands as it becomes ice, causing cells to burst and destroying tissue structures (an effect that is used in cryotherapy with the intent to destroy tissue). This causes the presence of freezing artefacts in the sample. Also, air bubbles can get into the sections, which can be difficult to distinguish from other areas within the specimen. Staining quality can also be affected. Arriving at an accurate and reliable diagnosis can be difficult. Alternative real-time technologies for the in-theatre assessment of surgical margins are being explored. Potential alternatives include rapid evaporation mass spectroscopy or the use of vibrational spectroscopy for rapid ‘finger printing’ of tissue samples.
Cytology
Cytology is the process of examination of individual cells of the body, unlike the usual method of studying human tissue (histology). Specimens for cytology often come from fine needle aspiration biopsies or from swiping a body surface (in this case usually oral mucosa).
The method of processing cytology specimens depends on the type of specimen and the concentration of cells in the collected fluid. If there is a high concentration of cells in the fluid, the specimen can be smeared on a glass microscope slide directly and then dipped in a series of stains, similar to the ones used for histological samples. If there is a low concentration of cells in the fluid, the cells must first be concentrated before they are stained. The cell samples can then be examined under a microscope, looking for the presence of abnormal cells.
Common uses of biopsies in oral & maxillofacial surgery
Excisional biopsy
This is simply the detailed examination of the margins of a resected diseased part of the body. If the lesion removed is benign, then the examination may be limited to confirming the diagnosis and that no part of the lesion has been left behind in the patient. In malignant disease not only must the disease be confirmed so a diagnosis and prognosis can be offered, but detailed examination of adequate clear margins at every point of a three-dimensional structure must be confirmed. Debate exists about what constitutes an ‘adequate safe margin’. In many malignancies a macroscopic margin (what the surgeon sees and plans and the patient loses) is around 1 cm of apparently healthy normal looking and feeling tissue at all points of the relevant anatomy. A microscopic safe margin is often considered to be 5 mm (after the fixation process described above, which always results in tissue shrinkage). Larger margins have in the past been seen as desirable for certain disease, for example malignant melanoma. Over the years the recognition that cancer is a cellular disease and that greater degrees of radicality did not improve overall survival but did reduce patients quality of life, has resulted in smaller accepted ‘adequate safe margins’ and some evidence suggests as little as 2 mm microscopically equates to similar overall survival as 5 mm, although the evidence is mixed. These figures certainly represent the minimum safe amount of healthy normal tissue to be removed in continuity with a cancer. An example would be excision of a tongue cancer.
Incisional biopsy
This is a diagnostic technique used for all lesions where uncertainty about the diagnosis exists. If a lesion is suspected of being malignant then a small area of the suspect pathology and normal surrounding tissue is cut out, usually in the form of an ellipse and the wound is closed with sutures. This allows orientation of the specimen for the examining pathologist and a diagnosis to be established. Punch biopsies may allow diagnosis but are harder to interpret because no normal tissue is seen. An example would be the incisional biopsy of a persisting mouth ulcer.
Core needle biopsy
In maxillofacial practice, there has been a long tradition of deriding this biopsy technique as either unnecessary (a properly performed incision biopsy yields more information and the wound can be closed) or dangerous. The latter was because it was believed a thick core biopsy needle carried a risk of seeding tumour cells. An example of this was parotid tumour core biopsy, where it was felt that seeding a benign tumour could convert a benign, surgically curable lesion to a multifocal incurable one. More recently several studies have failed to demonstrate any truth to this belief and there is no doubt that it is far easier for the pathologist to make an accurate diagnosis on a core tissue sample than on a cytological sample, especially in highly complex tumours such as salivary gland tumours.
Fine needle aspiration biopsy
This tends to be used either where cytology is very well established with high sensitivity and specificity and the lesions to be diagnosed are common and may not have to be treated surgically (thyroid lumps, especially cystic swellings are a common example), or difficult or potentially dangerous to access lesions (deep lobe parotid tumours are an example). Ultrasound imaging guidance often improves the diagnostic yield of fine needle aspiration biopsies.
The communication channels: pathologist => surgeon => patient
The histopathologist conveys the information about the biopsy sample(s) to the surgeon. Specialisation and super-specialisation may mean that these individuals know each other and can easily pick up the phone, get immediate access and have a sensible conversation. However, if that is not the case the surgeon in informing their patient has to rely on the written word, the report received from the histopathologist. It is convenient for a histopathologist to literally describe what they see (‘pink and blue splotches on a purple background’) in their own jargon, but this will be difficult to decipher and interpret even for a well-informed surgeon.
What is actually helpful for the surgeon, is if the histopathologist makes an effort to ‘translate’ the description of their findings to a language that is clear to a surgeon. For example, what entity the pathologist believes the specimen to be, how it appears to be behaving, has all abnormal tissue been removed, and if so by how much, if not at which point in the specimen is it not, and relate that to the biopsy diagram provided. This is a pretty antediluvian way of communicating complex three-dimensional information about relatively rare and unpredictable disease. So one would think this aspect could be an area for development of more contemporary and more inclusive communication methods. In reality the two groups tend to work away in their own silos and simply do not communicate or have enough joint learning time together.
One way of trying to overcome this communication problem is the presence of specialist pathologists (and all other relevant specialists) at multidisciplinary clinical meetings. This helps but is, obviously, extraordinarily expensive in terms of specialists’ time. Some common sense approaches are needed here (there has been a national directive in the UK to promote a common sense approach in managing these multidisciplinary clinical meetings so that they are maximally effective).
In practical terms, both quality and speed of communication between surgeons and histopathologists are of great significance. For example, outpatient clinic appointments are often made for patients to return for suture removal and confirmation of a suspected diagnosis, or confirmation of complete excision. Typically, such specific clinics occur at weekly intervals. The diagnosis of cancer, for example, should be given face to face in a supportive environment, not over the phone by whoever happens to see the result. But if pathology takes 10 days and clinics are every week - is speed more important than the right person and place to provide information to patients? What has been said about the quality of communication between histopathologists and surgeons, also applies to communication between surgeons and patients. Again, both parties have their roles to play in promoting good and helpful channels for information exchange.